
 Esperanto
 Shqiptare
 Euskara
 Zulu
Zulu
 Latinus
 Cymraeg
 தமிழ்
தமிழ்
 Slovak
 Slovak
 Afrikaans

-
-
About Us
-
Service
-
News

News Center
How to Solve the Problem of Laser Cutting Slag (Dross)? A Practical Troubleshooting Guide
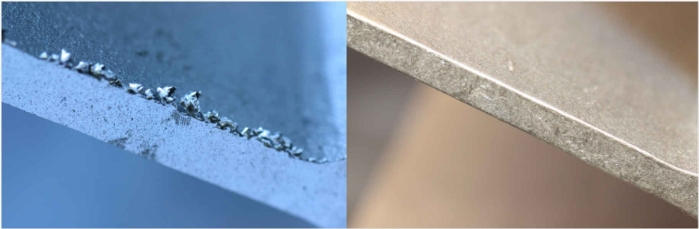
Laser cutting is renowned for its precision and speed, but achieving a perfect, clean cut edge every time can sometimes be challenging. One of the most common issues operators face is slag, also known as dross. This is the resolidified molten material that adheres to the bottom edge of the cut, negatively impacting part quality and often requiring time-consuming secondary cleaning operations.
Eliminating slag is crucial for efficiency and maintaining high standards. Fortunately, it's often solvable by systematically checking and adjusting key components and parameters. This guide provides a practical approach to troubleshooting and resolving laser cutting slag issues.
Systematic Troubleshooting Steps to Eliminate Slag
Instead of randomly changing settings, follow these steps methodically:
1. Inspect Cutting Head Consumables & Optics
These components directly influence the laser beam's shape, focus, and the effectiveness of the assist gas delivery. Wear or damage here is a frequent cause of slag, especially on machines with significant operating hours.
-
Check the Nozzle:
- Condition: Look for damage, deformation, or blockage. A damaged nozzle orifice distorts the gas flow, preventing efficient ejection of molten material.
- Centering: Ensure the nozzle is perfectly centered with the laser beam. An off-center beam can lead to uneven heating and poor slag removal on one side.
- Size: Verify you are using the correct nozzle type and orifice diameter for the material type and thickness being cut. Using the wrong size can result in improper gas pressure and flow dynamics.
-
Check the Protective Lens (Cover Slide):
- Cleanliness: Inspect for dust, spatter, fingerprints, or cloudiness. A dirty lens absorbs laser power, reducing cutting efficiency and potentially altering the beam profile, leading to increased slag. Clean or replace as necessary following manufacturer guidelines.
- Damage: Look for cracks, pits, or heat spots. A damaged lens must be replaced immediately as it severely degrades performance and risks further damage to the cutting head optics.
-
Check the Ceramic Ring (Nozzle Holder):
- Condition: Inspect for cracks or damage, especially if your machine uses capacitive height sensing. Damage can affect nozzle centering and height-following accuracy.
- Seating: Ensure it's properly seated and clean. Debris can cause misalignment.
2. Review and Optimize Cutting Process Parameters
Incorrect process parameters are a primary cause of slag, particularly when setting up a new job or if optimal parameters haven't been established yet. This is often the first place to look on newer machines where consumable wear is less likely.
-
Cutting Speed:
- Too Fast: The laser may not fully penetrate the material, or the molten metal isn't ejected cleanly before moving on, often leaving beaded slag.
- Too Slow: Excessive heat input melts too much material, overpowering the assist gas's ability to eject it cleanly, resulting in thick, stubborn slag. The Heat Affected Zone (HAZ) also increases.
-
Laser Power:
- Too Low: Insufficient energy to melt through the material cleanly, leading to incomplete cuts or heavy slag adhesion.
- Too High: Similar to cutting too slowly, excessive power can create too much molten material for the gas to handle effectively.
-
Focus Position:
- The focal point's position relative to the material surface is critical. An incorrect focus (too high or too low) results in a wider kerf at the bottom or top, reduced power density at the cutting point, and poor slag ejection. Adjust the focus position based on material type and thickness (e.g., typically slightly below the surface for oxygen cutting mild steel, near or slightly above the surface for nitrogen cutting stainless steel).
-
Assist Gas Type:
- Ensure you're using the correct gas (e.g., Oxygen for mild steel, Nitrogen or Air for stainless steel/aluminum). Using the wrong gas type guarantees poor results and heavy slag.
-
Assist Gas Pressure:
- Too Low: Insufficient force to blow the molten material clear from the kerf, causing it to resolidify as slag.
- Too High: Can cause turbulence in the cut, potentially cooling the kerf excessively, leading to incomplete cutting or unstable melt ejection. It can also cause excessive nozzle wear or gouging on thinner materials.
3. Verify Assist Gas Quality and Delivery
Even with the right parameters and consumables, issues with the gas itself can cause slag.
- Gas Purity: Particularly crucial when using Nitrogen for stainless steel or aluminum. Impurities (like moisture or oxygen) can cause oxidation and poor edge quality with increased slag. Verify the purity meets the laser manufacturer's recommendations.
- Gas Flow/Supply: Ensure there are no leaks in the gas lines and that the supply system (tanks, generator) can maintain the required pressure and flow rate during cutting. A pressure drop during cutting leads to insufficient slag ejection.
Troubleshooting Approach: New vs. Older Machines
While the potential causes are the same, the most likely culprits differ based on the machine's age and usage:
-
New Machines / New Material Setup:
- Focus First on Parameters: Assume consumables and optics are in good condition. Start by verifying and adjusting cutting speed, laser power, focus position, and gas pressure based on manufacturer-supplied parameter tables or cutting databases. Fine-tune these systematically.
- Verify Gas Type & Purity: Double-check that the correct gas is selected and the supply is clean.
-
Older Machines / Existing Setup Suddenly Producing Slag:
- Prioritize Consumables & Optics: Begin by inspecting the nozzle, protective lens, and ceramic ring for wear, damage, or contamination. These parts degrade over time and are common failure points.
- Check Gas Delivery: Look for potential leaks or reduced flow/pressure that might have developed.
- Review Parameters Last: Only after confirming consumables and gas delivery are okay should you start significantly altering previously working process parameters. Minor adjustments might be needed due to subtle changes in machine performance over time, but drastic changes usually point to a hardware issue.
Parameter Adjustment Quick Reference Table
This table shows how common parameter adjustments typically affect slag formation (Note: Effects can interact, and optimal settings depend on material/thickness).
| Parameter | Issue | Potential Effect on Slag | Recommended Action (Trial & Error) |
|---|---|---|---|
| Cutting Speed | Too Fast | Incomplete cut, beaded slag | Decrease speed |
| Too Slow | Thick, hard-to-remove slag, increased HAZ | Increase speed | |
| Laser Power | Too Low | Incomplete cut, heavy slag adhesion | Increase power |
| Too High | Excessive melting, thick slag (if gas can't clear) | Decrease power (or increase speed/adjust focus) | |
| Focus Position | Too High (in material) | Wider kerf at bottom, reduced power density, potential slag | Lower focus position (move towards negative values often) |
| Too Low (below material) | Reduced power density at cut point, potential slag | Raise focus position (move towards positive values often) | |
| Gas Pressure | Too Low | Ineffective slag ejection, slag adheres to bottom | Increase pressure |
| Too High | Turbulence, potential cooling, unstable cut, possible slag | Decrease pressure |